!!!!!!!!!!!!!!!!!!!!!!!!!!!!!!!!!!!!!!!!!!!!!!!!!!!!!!!!!!!!!!!!!!!!!!!!!!!!!!!!!!!!

Please Visit DIY Tool Supply for all your Tool Needs

Showing posts with label DIY Floor Tiling. Show all posts

09 April 2007

Master Bath Shower Project Summary

There is nothing more satisfying than completing a project, except for maybe having a record of what you did. Thanks to the world of digital cameras and blogging it is easier than ever to relive a project and to see how far you have come. My shower took a lot longer than I expected but it was completely worth it. Nothing is more relaxing than having all the sprayers going. I look forward to waking up in the morning just so I can shower.


Here is a summary of the work I did:

1. Ripped the old shower out along with the walls, ceiling, old pan, and subfloor.

2. Put in a new GFCI outlet and switch to run the fan/light combo.

3. Installed the fan/light combo and replaced the ceiling.

4. Took out the old plumbing and replaced it with a new mixer, body jets, and rainfall shower head.

5. Installed a new subfloor.

6. Installed the new swanstone shower pan.

7. Put up hardibacker.

8. Tiled the walls.

Here are some before and after shots:

In the next post I will outline the total cost of the remodel along with the sources of most of the products used.

03 April 2007

How to Tile Shower Walls

Once the Hardibacker was up it was finally time to get to the tiling. This is the fun part and my wife (8 months pregnant) decided to join me.

A few things to note before getting started:

1. Do not use Mastic, use a thinset and stay away from the premixed stuff.
2. You want to dampen the cement board prior to troweling thinset on. If you do not, the cement board will draw the moisture out of the thinset too quickly, making for a brittle set that is susceptible to cracking.
3. Pick out the right trowel for your thinset and tile size, also pay attention to spacing recommendations and use the right spacers. I recommend 1/8” or less spacing so that you can use unsanded grout (easier to seal).
4. Remember you are not going to grout at the corners, you are going to caulk so try to maintain an even spacing.


5. GET THE RIGHT TOOLS FOR THE JOB. I suggest you spend a little money to rent or buy the correct tools as they will make it that much easier. I have put together a few must haves here:


  • Tile Saw or Tile Cutter

  • Notched Trowel

  • Grout Float

    I used 9x12 ceramic wall tiles. According to the directions on the thinset a ¼” V-notch is called for. The first thing I did was to measure up 11 ½” from the bottom of the cement backer board. This gave me a ½” overlap over the shower pan’s tile lip. I then used a level and a sharpie marker to draw a horizontal line all the way around the shower stall. I used this line as a guide for the top of the first row so that all tiles will be level.


The first night I mixed up enough thinset to do the bottom row. I moistened the Hardibacker with a sponge and then troweled on a glob of thinset. I used my v-notched trowel to spread the thinset and then set the tile into it. You want to push the tile into the thinset while giving it a little twist back and forth to get it well set. Then pull it off and make sure 95% of the tile is covered with thinset. This shows that you will get good tile coverage and therefore strong adhesion.


I used spacers in between the tiles and shims under the tile to make sure they stayed in place while they were setting up. I left the first row to set over night since this would be the support for the rest of the tiles.


Over the next few nights my wife and I, along with some help from our dog (chihuahuas love home improvement), laid tile on the rest of the shower following the same procedure as we did for the first row. Simplified, here it is below:

1. Measure up 12 inches from top of the last row. Mark line with a level as guide for next row.
2. Spread thinset between last row of tile and marked line with v-notched trowel.
3. Set tile into thinset using spacers all around.
4. Repeat for next row up.

After finishing the tile, we let it set for 48 hours before grouting. In the next post I will discuss grouting.


I know it is hard to get a feel for how exactly to tile by reading the procedure and looking at pictures. I did quite a bit of reading before I began. Again, if you ar not comfortable with the process I would do a little more reading.

02 March 2007

Trim and Some Finishing Touches

I got quite a bit of work done last night on the master bathroom renovation. I was able to touch up some of the grout work along the edges where the baseboard trim would not hide it, I nailed in the trim and then caulked the edges. I also resealed and caulked the tiled shower. I started to install the trim plates and the shower handle. The new body jets are looking pretty inviting. Altogether the shower is impressive. It is all tile with a mosaic 3/4 of the way up and will be equipped with two body jets and a rainfall shower head. This is quite an upgrade to the boring surround that was in there before. I was also able to caulk around the fixtures and paint the ceiling. Here are a few pictures of the progress.


01 March 2007

Buying Extra Tile

Whenever I measure the square footage of a room to tile I always add 10% and then buy however many boxes I need to get to that number. That normally leaves me with quite a bit of extra. All of this extra tile gets stored in the attic just in case, I mean, until I need it again.

Recently, I had some kitchen floor tiles that were moving on me. I simply pulled them up, scraped the old thinset off the subfloor, and reinstalled new ones. I even had some of the grout left over making for a seamless fix. Here is a recent article explaining a little more in depth why it is a good idea to have a little extra tile.

Store Your Extra Tile for Repairs by:
Dalton C. Reynolds

A bit of forethought when you tile a floor in your home can preserve the look of your floors and save you money in the future. After you have selected your new tile for a surface in your home, be it a kitchen counter, a living room floor or a bathroom from a local tile resource, you will have to have a tile installer measure the space to determine how much tile you will need for the job. Some people prefer to have the area measured before they begin their search. This just depends on whether you will be hiring the installer yourself or asking the tile company to recommend one. You might even be tiling the floor yourself and arrive at the tile store with your measurements. In any case, once your selection is made it is a good idea to talk to the store representative about buying a bit more tile than is needed for the job. There are many reasons for this which will be outlined next. When your new tile is selected you will take possession of a shipment which has been manufactured at the same time. This ensures that all of your tile will match. This is true of natural stones as well. Think of this as you would a dye-lot with respect to the manufacturing of carpet. While natural stone can vary from crate to crate, tile, with an artificial finish, will match in much larger quantities, but there is still color variation. Purchasing more tile than you need at the time of installation will ensure that anything that may have to be repaired in the future will have a replacement that matches the originally installed product. You can tuck these extra tiles safely away in the attic or basement until you need them. Failure to do this may result in 2 problems. The first problem would be having to find out if the tile is still in production if it has been years since the tile was installed. The second problem, even if the tile were still being produced, is would it match the original floor? A little planning ahead will save you time and the hassle of locating the same product. You can almost guarantee in the case of natural stone, that you will not be able to find a match with the same color and pattern. Any replacement you do with a non-original piece will always look replaced. If you do find that you need to replace a tile in the future, here are a few tips that will assist you. Whether water damage in a bathroom, or movement in the floor, sometimes a tile will need to be replaced. You might have noticed that when you walk on a tile, it will have a hollow sound underneath it. This means that bond between the tile and the adhesive that it is set in has broken. To replace this tile you will need to first remove the grout from around it. This can be done with a grout saw or similar tool. Always wear safety goggles to protect your eyes from any debris. Once the grout has been removed you will need to break the tile and remove the pieces. To break the tile uses a hammer and a chisel. Once the tile is shattered you need to pry any pieces which may still be adhered to the wall or floor. A sturdy, flathead screwdriver can be used to do this. Next you will need to chisel out the adhesive and clean the area in preparation for new adhesive and grout. If you are working on a wall, make sure that you are careful not to damage the drywall behind the tile. In some case this might need to be patched and replaced if moisture has compromised the wall’s integrity. You will not know until you get into the project. Cleaning the area is an essential step because you want the new tile to be level with the rest of the wall or floor. Once the area is free of adhesive you can then apply new adhesive and place the new tile in the open space. It is recommended that you use spacers that are the same size as the original grout lines. These can be obtained at a home improvement or hardware store. After the adhesive is dry, it is time to grout. It is best if you take a piece of the old grout and match it to what is currently available on the market. The color of grout has a tendency to age over time and you will want an exact match to avoid having the tile look like a patch job. Any questions you may have about replacing your tile should be directed to a quality tile installer or tile company. Plan ahead when tiling your home. Whether it is new construction or a new tile addition to an existing home, a few extra tiles will save you major frustration and make any repairs hard to detect.

About The Author

Dalton C. Reynolds is a contributing writer for http://www.atlantadesigndirectory.com and renovates homes for clients in the greater Atlanta, GA area. Copyright © 2006 Dalton C. Reynolds.

23 February 2007

Marble Tile

I was in the Home Depot the other day and I found these beautiful marble tiles that were on sale for $1.95/ea. It was such a good deal that it was hard for me to pass up. Even though they were not the right color for my bathroom tiling project, I wanted them. Marble Tiles!!! What a beautiful way to add class to a bathroom.

Unfortunately I don’t have any experience laying marble tiles and from what I can tell you need to have a very level floor in order to get a nice look. The key with marble tiles, or any smooth natural stone tile is that you do not want it to look like tile, you want it to look like a stone face. This is accomplished through perfect height adjustment, close grout lines, and grain matching.

I am a pretty handy DIYer but I am not about to try to make the floors level in a 70 year old house that is built on pillars. I guess I will have to save that dream for another project. I will keep watching for a slate tile that I like to go on sale so that I can redo my kitchen countertops.

Mastic taking Longer Than Expected

Well, here I am smack in the middle of DIY Bathroom Remodeling Project that is going nowhere fast. Now I know as an engineer that when we design a product and spend all the time testing it, working with it, writing recommendations about how to use it, and then simplifying it down into directions for consumers that it is pretty dumb when they don't listen. I should have listened. Now I have a whole floor full of tiles that I have been waiting on for a week to set up. A quick analysis of what happened:

  • The tiles are too large to use mastic (12x12)
  • The room is too cold for them to set up quickly(62 F)
  • There is too much humidity (70%)

The last few days I have cranked the heat up in the bathroom and the tiles are finally setting up. I should be ready to grout this weekend. Then it is a matter of slapping some paint on the walls, crown and base moldings, changing out an overhead light, and reinstalling the fixtures.

I wish that I had a little more time to work on the bathroom. I would like to put in wainscoting and a full glass shower door but that will have to wait. Unfortunatley, I have to get a dishwasher in before the baby comes (2 weeks but could be any time now). That will be the next not so do it yourself project.

22 February 2007

Tiling a Floor - Simplified

I found this article by Mark Donovan, who has quite a few more years experience than I do when it comes to tiling. I though it really laid out the procedure well.

Flooring: Installing Ceramic Tile
by: Mark J. Donovan


Ceramic Tile brings a texture, richness and color to a room that Linoleum has yet to truly mimic. Tile floors can be installed in any room, however they are most frequently seen in Bathrooms and Kitchens. I particularly like them in entryways, where they serve as a transition point from the outside to large carpeted or hardwood floored rooms. They make for easy clean up and are impervious to water damage.

Tile Types

Ceramic tiles come in two basic types. Glazed and Porcelain. Glazed holds up the best for heavy traffic areas and porcelain works well in bathrooms. Porcelain is typically more expensive, so consider your budget and the size of the area you want to tile. Tiles also come in many shapes and sizes. For flooring, however, I would suggest using larger tiles up to 12” x 12”.
Underlayment
For proper installation the base foundation or the underlayment is critical. Typically it consists of ¾” to 1 ¼” of plywood. Tiling over Linoleum or existing tile is also feasible, as long as it is solid. I also recommend when Tiling over Linoleum that you first apply ring nails or screws 6” on center over the entire area. Tiles can also be installed directly over Concrete. Make sure in all cases that the floor is level and free of dust and debris prior to installation. There are leveling compounds that you can apply before applying tile if necessary.
Preparing the Site
Before actually installing the tile, it is best to lay it out in the room to see how it will look. Pay close attention to how it runs out toward the walls, in the corners and next to cabinets, tubs and toilets. The trick is to lay the tile out such that stubby tiles do not show up in highly visible spots. Once you have completed this, make two marks with a pencil outlining the most centered tile. These lines should be perpendicular to each other. Also take note of the wall that is most visible from all the others. Now remove the tiles. Next draw or snap a line perpendicular to this wall that is in line with one of the marks you made on the floor.
Then, draw a perpendicular line to this first line. This second line should be centered with the first line and fairly in line with the second mark you made on the floor. Once you have completed this task, re-layout some of the tiles along the perpendicular lines and observe if they run out in a way that will limit cutting and stubbed tiles. Once this is completed, remove the tiles and prepare for the actual installation.

Installing the Tile

Again, make sure the area is free of dirt and dust. Next apply the ceramic adhesive or mastic to the flooring, starting in the center, where the two perpendicular reference lines intersect. Apply enough material to cover 6-10 square feet, if no cuts are required. If cuts are required limit the amount of mastic application to about 2-4 square feet. When applying the mastic, first spread it with the flat end of the trowel. Lay it on relatively thick, approximately 1/8” to 3/16”thick. Then turn the trowel around and run the notched edge over it. This creates ridges in the mastic that helps to hold the tile down more securely. The larger the tile, the larger the notches should be. For example, I use a ¼” notched trowel for 12” x 12” tiles.
Note: Only make up enough ceramic adhesive for 30 minutes, as this material has the tendency to harden up rather quickly.
Once the adhesive has been applied, begin installing the tiles working from the center outward. On larger tiles you should back butter them. Basically, apply a thin coating of mastic to the back of the tile prior to laying it on the floor. This will help ensure a good bond.
As you near the walls or edges of cabinets, tubs and toilets, you will need to cut some of the tiles. I highly recommend the use of a Wet-Saw. A Wet-Saw will allow you to make very accurate cuts, both large and small. You will also save money, as you will waste many fewer tiles with bad cuts or broken tiles. Wet-Saws are not that expensive and once you see your finished product you will certainly be installing more tile. Wet-Saws can also be rented as a cheaper alternative.
When applying Tiles, you may want to use Lugs. Lugs are effectively spacers that come in various thicknesses. I typically like to have no more than a ¼” space between the tiles. Employing Spacers will ensure uniformity with your tile spacing.

Grouting

After the Tile has been completely installed, allow it to sit for 24-48 hours before applying grout and walking on it. Grout comes in many different colors and is very easy to install. Simply mix the grout with water or a special bonding agent and apply with a rubber trowel. Run the trowel on a bias when going over tile corners.
Once the grout has been applied, immediately wipe the tile of excess grout, using a wet sponge and a bucket of water. Wait 30 minutes and again wipe the tiles down of any residual grout. Wait another 60 minutes and repeat. If grout is left on the tiles to dry, you will have a great deal of elbow work scraping it off.
Let the grout sit up for 24 hours and it is ready for use and admiration.

About The Author

Over the past 20+ years Mark Donovan has been involved with building homes and additions to homes. His projects have included: building a vacation home, building additions and garages on to existing homes, and finishing unfinished homes. For more home improvement information visit http://www.homeadditionplus.com and http://www.homeaddition.blogspot.com.

21 February 2007

Laying the Rest of the Tile

After the full tiles have set up I go back and mark the tiles to be notched. I then took them to the garage and used a wetsaw to cut the notches out. I will "butter" these pieces by spreading the mastic on tile instead of the floor and then press them into place. Here you can see I have placed the rest of these tiles in place. All I need to do now is wait for them to set up so that I can begin to grout.

I think that tiling your bathroom and kitchen is one of the easiest and least expensive ways to add value to your home. It has been proven that the kitchen and the baths are where you get the most bang for your renovation buck. Linoleum will not sell a house, but tile just might.

20 February 2007

Laying the Tile

Before you start laying the tile you should place them down to get an idea of the pattern you want to lay. It varies with each room but lay them out so that you do not have very thin tiles at the ends of the row. You then want to look on the package of mastic or thinset and see what the recommended notched trowel size is for your tile size. I am using mastic along with 12x12 tiles in this project and it is recommended that I use a ¼” square notch. Normally, it is not recommended that you use mastic with larger tiles. This is because the mastic sets up by evaporating water out and the larger tiles hinder that. I have had good results in the past however so I am going to go for it. Here you can see the trowel that I will be using.


You then want to spread the mastic or thinset down with the trowel and scrape at a 45 degree angle leaving a set of nicely profiled lines. Lay a tile, and then pull it back up. Check to see if there is 95% coverage on the tile. If so, then you are in good shape and you can keep working a small area at a time. Remember to place your spacers between the tiles.
I like to lay all the full tiles at once and let them set up, then go back the next day and mark the notched tiles for cutting.


This is where I am currently with this project.


19 February 2007

Removing the Fixtures

Here is the next step in showing you how to tile a bathroom floor. Step 2 in tiling a bathroom floor is the removal of the sink and the removal of the toilet. You may be tempted to tile around them but the right way to do it is to remove them; it will look nicer in the end too. Removing a pedestal sink, like I have to do, is an easy step. You turn off the water, unscrew the water supply lines, unscrew the drain pipe, and then unscrew the bolts holding it to the floor and wall. You can then easily lift it up and away.

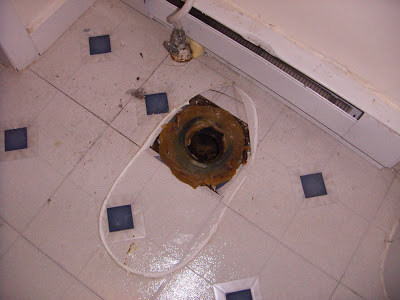
The next step I will show you is how to remove a toilet. This is also useful if you are trying to remove flooring or if you need to know how to fix a toilet. You want to turn off the water just like when you are removing any plumbing fixture. You then should flush the toilet to drain the tank. Use a large sponge to remove the rest of the water from the toilet bowl. It is advantageous to remove the tank from the bowl and replace the seals. I won’t be doing that in my renovation because the toilet is rather new. The next step is to disconnect the water line usually on the bottom of the tank on the back left. I have American Standard toilets but you may also have a Toto toilet or a Kohler toilet, there are many brands but they all work the same.


Then you unscrew the nuts on the toilet bolts. You may need to hold onto the bolt with a pair of locking pliers so it does not spin when you are unscrewing the nut. If this is the case, place a rag between the bolt and the jaws so you do not damage the threads. Once the nuts and washers are off you are ready to lift the toilet bowl straight up off of the bolts and set it aside.


You then want to remove the old wax ring and scrape off anything left of it. You can remove the toilet bolts at this time also as you will get new ones with the new wax ring. Be sure to stuff a rag in the drain when you are done to prevent septic gases from leaking up into your space.


Tiling a Floor

Tiling is one of the easier projects that a DIYer can take on. You can tile over hardwoods (not recommended), tile over plywood, tile over linoleum, tile over cement, even tile over old tile. You just have to pick bedding that is compatible with the sub floor you have; it will say right on the package. There is a reason I don’t recommend tiling over hardwoods. Mainly, if you have them, why hide them? You can refinish old hardwood floors, I have a whole section on that. There is another reason however and you will have to bear with me for a minute as I am an engineer by profession. Graining in hardwood floors runs in one direction. Because of that, the thermal expansion is greater than for other sub floors. Plywood is formed so that each successive layer has the graining running in a perpendicular direction to the previous layer. Because of this, it does not expand and contract as much with a temperature change. If you must tile over hardwoods, screw down a thin layer of plywood over them before tiling.

The first step in a successful tiling job is to remove the baseboard trim. Take a box knife and score the caulk on the upper edge. Then, get a pry bar like the one pictured to the right. Bang it in between the trim and the wall and pull the trim off. I am in the process of tiling a bathroom right now and below is a picture of all the trim piled nicely in the center of the room. If you take care the trim can be reused when you are done.